BACKGROUND:
Measuring liquid is
difficult for students. Practice makes students more proficient,
but not experts. It takes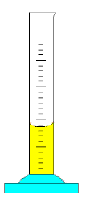 experience and skill to measure when using
a graduated cylinder.
experience and skill to measure when using
a graduated cylinder.
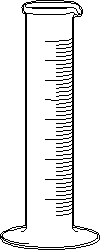
Discuss the divisions of measurement
on your graduated cylinder. A graduated cylinder measures in milliliters,
which is a measure of volume. The English system equivalent is pints,
quarts, and gallons. It is much easier to measure in milliliters,
because it is already divided into the decimal system for you. Just
as students measured using metric with the left side of the decimal point
centimeters and the right millimeters, the same is true for metric volume.
Measuring with a graduated cylinder
is complicated somewhat by a meniscus. A meniscus is the curvature
of the surface of the water. Water "sticks" to the walls of the graduated
cylinder, but only on the sides and not the middle. When students
look at the surface, the water level is not straight. Measurement
should be at the lowest point (see figure to the right). Students
need to read the meniscus at eye level in order to get an accurate reading.
Students should place the graduated cylinder on the table and then lower
their heads to be able to read the meniscus at eye level.
PROCEDURE:
- Explain to
students that learning to measure volumes takes practice. Today they
will practice measuring different liquids. They will use a container
called a graduated cylinder to measure liquids. Graduated cylinders
have numbers on the side that help you determine the volume. Volume
is measured in units called liters or fractions of liters called milliliters
(ml). Students need to follow the directions on the lab sheet carefully.
Remind them that you will be checking how they measure as you move about
the room.
- On the board show
students a drawing of a graduated cylinder with a meniscus. Demonstrate
where you would take the measurement. Ask them to work over the dish
provided to make clean-up easier. Styrofoam meat trays work well
for this.
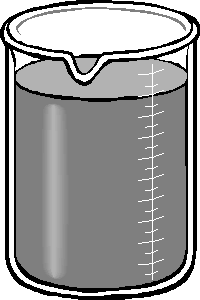
- Show students the beaks
on both the graduated cylinder and the beaker. Tell them that they
should use the beak to pour from.
- Distribute the lab
sheets. Ask students to complete the prediction and then to follow
the directions on the lab sheet. It is difficult for students to
measure because they are usually not patient. It is important for
them to keep trying.
- When the lab is completed,
ask the students to answer the conclusion.
- Students should notice
that the addition of salt does not effect the volume of the water.
This is because as the salt dissolves, its molecules fill in the free spaces
between the water molecules. The volume would change if enough salt
was added to saturate the water. Be sure to use soapy water to clean
the glassware containing oil.