BACKGROUND:
Different types of building materials respond
differently to the shaking caused by seismic waves. Materials such as brick
and stone break easily during an earthquake. The mortar that typically holds
these materials together shakes loose because it is not strong. Brick,
stone, and mortar structures are very unsuitable dwellings for
"earthquake country." In addition, non-bearing walls of bricks or
stone are extremely dangerous because they are not structurally part of a
house. Wood and steel are much better at withstanding seismic waves. Both of
these materials flex as the earth shakes.
Weak materials can be reinforced to make them
relatively safe. Reinforcing structures with a steel frame, or driving beams
through a structure will help support it during shaking.
Architects and engineers can also design and construct
buildings that can withstand intense ground shaking. For example, designs
that are broader at the base than at the top or homes that are not more than
two stories high survive earthquakes fairly well. Ornate pillars or facades
(fake fronts) on a home do not survive shaking well. Engineers need to
consider the rigidity of the building material. The material should be able
to bend or flex without damage in an earthquake. For instance, wood bends
but brick and mortar does not. Engineers need to reinforce brick masonry by
putting steel beams through the structures. Many buildings were built prior
to strict earthquake codes, so in many places such reinforcement is
necessary. Bracing a structure is an alternative way to prevent damage.
Engineers and architects can make structures earthquake resistant, but they
cannot make them earthquake proof. If you are unfamiliar with
reinforcing techniques or want to learn more, the Association of Bay Area
Governments website has excellent, up-to-date information (www.abag.ca.gov/bayarea/eqmaps/fixit/fixit.html).
PROCEDURE:
- If necessary, gather the materials to make shaker boards before lab.
You require a flat board about 3/4 inch thick with a length longer than
its width (12 x 18 inches). Here are directions for assembling them:
- Place the marbles in the plastic top. The marbles will act as
ball-bearings in the experiment.
- Balance the shaker board on top of the marbles. This completes the
shaker table.
- Set up stations with shaker tables and building materials. Toys can
include Lincoln Logs, Legos, Slinky building toys, or any other building
toys that students can bring in from home.
- Discuss with students that the hazards of an earthquake are directly
related to the magnitude of seismic waves. Have the class make a list of
earthquake damage on the board. It should include such school and home
damage as unreinforced masonry, bookshelves that are not secured, or
houses that are not bolted to their foundations. Explain that some
hazards can be avoided by taking precautions before an earthquake
occurs.
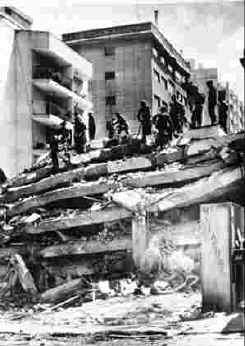
- Show the class the images of building damage caused by earthquakes
from the Earthquake Slideshows.
- Demonstrate how the shaker board works to the class. When it is
"jolted, "it simulates the movement of the Earth's surface (an
earthquake). The "earthquake" creates energy that moves along
the surface of the shaker table as waves. Control the intensity by how
fast you shake the board. Demonstrate to students that a strong
earthquake occurs when you shake quickly; a weak earthquake occurs when
you shake it less violently. A moderate earthquake occurs when you shake
it somewhere in between. On the lab worksheet, slow-long means to move
the board in the long direction slowly (this is relative). Quick-long
refers means moving the board in the long direction quickly. This will
illustrate that intensities B and D (both quick) represent a high number
on the Richter Scale while A and C represent a low Richter number.
- Have the students complete the lab, following the worksheet. Emphasize
trying to improve their building structures to prevent damage.
You may want them to design a structure and shake it once, before you
discuss how you can reinforce the structure. If you talk about it before
they build the first structure their structures will tend to have those
features that you discuss already in them. The objective of this lesson
is for them to see that a dramatic change in the strength of a structure
that they have reinforced. You make want to have double stick velcro
available, so students can secure their foundations to the shaker board.
This exercise has become to known as "Save the Baby."
- Discuss different real building materials and their relative
resistance to earthquakes. The students should be aware that most
structures have foundations, unlike the models they are using. You may
want to highlight the structures that were the most resistant.
|