BACKGROUND:
Shapes are all around us. Some
shapes are used to identify, such as traffic signs. Many people take
shapes for granted, not realizing the historical significance that
many have. Students should be familiar with a deck of cards. Show
them a deck of cards. Ask them what shapes are represented by American
playing cards. Hopefully they will tell you spade, heart, diamond,
and clubs. Ask them if they know where these symbols came from.
Do they think it was a 3 dimensional object or a 2 dimensional object?
(Actually these terms refer to both the 3d and 2d version).
These shapes have a historical development.
The English liked the French symbols and came up with names to describe
them. The original shapes are from heart = biological heart; diamond
= mineral; and spade = a tool that farmers used. The club is more
difficult to explain; and this is probably why it is the hardest shape
to "remember". The club came from the English version of a "trefle"
or three foil from the French. The English card-makers thought it
looked like a "club."
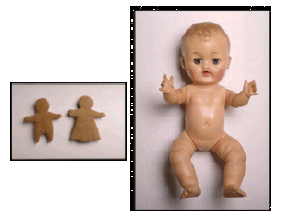
Children can have difficulty visualizing
the original three-dimensional shape after it has been made into a
2 dimensional one . Cookie cutters are a great example. Children
sometimes believe that by making cookie dough thick and then cutting their
shape out, they are creating a 3 dimensional shape. They often forget
the features which were compressed in order to make it 2 dimensions, like
a nose, mouth, or muscles!
PROCEDURE:
Emphasize that shapes are all around
us. Some we can model easily, but others are difficult. Tell
students many people, even teachers, use 2 dimensional items for something
that is 3-dimensional. Students will have to think before they name
a shape. The difference between 2 dimensional and 3 dimensional is
that 3d has depth or as it is commonly referred to, the "third dimension.”
The other two are length and width.
- Instruct students they will be turning
a cook cutter shape into a 3 dimensional object. Make sure clues
are give on how to turn a 2 dimensional cookie into a 3 dimensional object.
However, do not show them an example, because the key is for the children
to discover for themselves how “flat” or two dimensional they really see
the world.
 |
| Students describe and recognize 2 and 3
dimensional patterns using various cookie cutters. Includes 6
different cookie cutters |
- Give students a piece of wax paper
to do their activity on. Provide enough clay or play dough so they
can roll it out as “dough.” If you have rolling pins you may want
the students to roll it out. You can prevent a mess by first putting
another piece of wax paper over the clay and then rolling it. If
you don’t have rolling pins the students can flatten the clay by pounding
on it with their hands.
- Each person in the group should make
a cookie cutter shape. Direct them to construct a three dimensional
model of the cookie cutter shape. For instance, a circle should turn
into a sphere, but you can also consider a cylinder correct. If you
have a “gingerbread” type cutter, students should include a nose, mouth
and other three dimensional characteristics of a person. Again children
can have a difficult time understanding three-dimensional objects.
They believe that thickness is enough. Guide them to understand this
concept and they will remember it their entire life.
RECIPE FOR PLAY DOUGH
MATERIALS:
250 ml flour
125 ml salt
5 ml cream of tartar
250 ml water
about 1 ml food coloring
about 1 ml oil
DIRECTIONS:
Cook, with stirring, over medium heat until
the gloppy mess looks like play dough. Knead briefly after the mixture
has cooled a little. You will need to multiply this recipe by 6 to
get enough for a class of 30 students, but it should be made in two batches.
Large amounts of dough are difficult to stir because the mixture becomes
firm. Store the play dough in a plastic bag or margarine tub.
Play dough can be made and saved for a long
time if it doesn't dry out. Color the various play dough mixtures
depending on the activity. Many activities do not require a specific
color.