OBJECTIVES:
- Comparing how substances heat up.
- Taking temperature of different substances
VOCABULARY:
- cloud
- temperature
- molecules
MATERIALS:
- Drippy the Hippie by C. Fries - optional
- worksheet
- dark sand, light sand, soil
- thermometers
- Small tray (i.e. meat tray) (may want to make permanent sand containers, so you can easily put them out)
- sunlight (or desk lamp or heat lamps)
- cafeteria trays (or anything to bring out materials)
- clock
BACKGROUND:
Water most probably originated on this planet as gases emitted from volcanoes. The Earth's atmosphere captured this water and has continuously recycled it throughout time, in what is called the water cycle. Water evaporates and forms clouds. The clouds provide rain and snow, which is collected in rivers, lakes, underground reservoirs, and oceans that are the source for further evaporation. Heat from the Sun helps fuel the water cycle. In this lesson the students will learn that different substances heat up differently.
Under the same solar radiation (temperature), different substances will heat up differently. Oceans heat up slowly, but cool very slowly. Land heats up quickly, but then cools quickly. This causes a difference in air pressure which in turn causes wind. Breezes can be caused by conditions created by this changing heat.
Air that is warmed exerts less pressure on the ground causing a low pressure region. Air that is cooled is denser, causing a high pressure region. Remember that cold, cool, warm, and hot are relative terms. The movement of air is greatest from high pressure to low pressure when the temperature differential is the greatest.
PROCEDURE:
The lab exercise is to
prove to students that certain substances will heat up more quickly than
others. In your discussion you might want to review that heat
makes molecules of a substance move faster. Students should work in groups. Ideally in groups of two or 3 but it depends on how many lamps you have. Each group will have a lamp and a tray of white sand and a tray of black sand. There should be enough sand in each tray to cover the base of the thermometer as it rests in the dish.
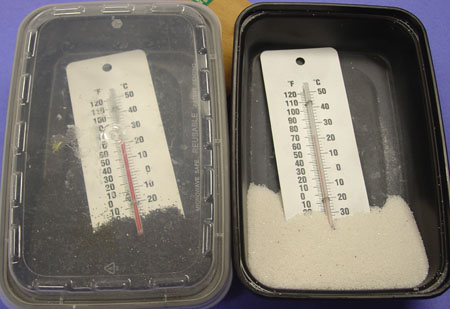 This experiment shows that light sand reflects more heat than dark sand, so it takes longer to heat up. Different surfaces on earth (water, ice, soil, and rock) heat at different rates. Salt water takes more heat to warm up than fresh water. Heat fuels the water cycle and in these lessons students will use their skills in taking temperature to compare difference substances.
There are various ways to heat the sand depending on your materials:
- Desk lamps with at least a 75 watt bulb work well. The lamp bulb just needs to be adjusted to be close to the sand.
- Heat lamps work but be sure to keep an eye on the temperature. Some heat lamps are so effective they reach the maximum for the thermometer very quickly and have even broken the thermometers. They also can burn students if they touch them. Heat lamps work best as a demo if you are short on lamps.
- You can also use sunlight but that takes more time. If you are short on time, you may want to prepare a set that is outside already for 10 minutes.
STUDENT PROCEDURES:
- Tell students you are doing an experiment to see if there is a difference in how quickly white sand and black sand heat up or do they heat up the same.
- Each group should have two thermometers, one for the black sand and one for the white sand. Students should read the starting temperature of each thermometer before placing it in the sand dishes. (NOTE: check when you hand them out that the temperatures are about the same. Some of the thermometers can be a few degrees off.) They should write down the start temperature in the space on the worksheet.). Students should then place a thermometer into black sand, and white sand. Emphasize with students that each thermometer should be the same distance below the surface
- Students should place their tray in the sunlight or under a lamp for 10 minutes and then record the temperature in the worksheet for heated white and black sand (you can also create a data chart on the board and have the students provide their data).
- Bring the trays inside (or turn off the heat lamp) and let them cool for 10 minutes before students record the temperatures.
- While you are waiting, either read or sing the song Drippy the Hippie to help students learn the words precipitation, evaporation, and condensation. Using the worksheet, discuss with children how water becomes clouds by evaporation. Water can be recycled in the process.
- Discuss with students their results. Which color sand heated faster? Which one cooled the quickest? The slowest? What color car do they think would get hotter faster, a black car or a white car?