|
|
Long-Term Project
Schedule |
|
Sept |
Practice measuring classroom objects
using cm and inches. |
|
Oct |
Take height measurements of plant growth
every other week and record observations in plant data booklets. |
|
Nov |
Take height measurements of plant growth
every other week and record observations in plant data booklets.
Plot all the data students have collected up until now on graphs
(can be done as late as January). |
|
Dec |
Take at least one height measurement of
plant growth and record observations in plant data booklets. |
|
Jan |
Take height measurements of plant growth
every other week and record observations in plant data booklets. |
|
Feb |
Take height measurements of plant growth
every other week and record observations in plant data booklets. |
|
Mar |
Take height measurements of plant growth
every other week and record observations in plant data booklets.
Students complete their graphs, adding recent data. Compare
information from all the graphs and make observations on patterns of
plant growth (can be completed in April). |
|
OBJECTIVES: Students record plant measurement data over time. seed, roots, leaves, sprout, stem MATERIALS: Plant growth models (Safariology -- Cycle of a
Green Bean Plant)
ADDITIONAL DETAIL FOR PLANT MEASURING
LESSON WITH SAFARIOLOGY BEAN PLANT MODELS MODEL 1 – SEED: The first model shows that
the life cycle of a plant starts with a seed. The purpose of the seed coat
is primarily to protect the embryo (or baby) plant against such hazards as
excessive drying, mechanical injury, and the digestive juices of animals
(if it is eaten). Many seed coats are impermeable to water or oxygen or
are hard, which helps them remain "asleep" or dormant for a long time.
When the conditions are right, the dormant seed will grow or germinate. Remember, seeds are used by other organisms as
food because seeds have food stored in them. Seeds furnish humans with
great proportions of food. A large part of the world relies on the grains
of wheat, rice, soybeans, corn, rye, and barley. Oils and fats are
produced from the seeds of coconut, corn, cotton, flax, castor bean,
sesame, peanut, and soybean. Oil from the cotton seed and peanut is
utilized in the manufacture of various products such as butter and lard
substitutes and soap. MODEL 3 – SEEDLING – ROOTS AND LEAVES: The third
model shows the development of first leaves and the increased spread of
the roots. With the development of first leaves, the plant is considered a
seedling. Most of the food produced by plants is made in the leaves. The
leaves provide ample surface area for the absorption of light energy and
contain many chloroplasts (which contain the molecules of
chlorophyll), and it is in the chloroplasts that photosynthesis occurs. Chlorophyll has pigments that take in energy from
the sun and convert carbon dioxide and water into sugars, a process that
is called photosynthesis. Photosynthesis allows the plant to feed itself
and continue to grow. BACKGROUND: Plants are living organisms and share common
characteristics with all other living things. All organisms have cells,
grow, reproduce, and respond to various kinds of stimuli like temperature.
However, plants have additional characteristics that distinguish them from
other organisms. Plants have the ability to manufacture food
(photosynthesis), have unlimited or almost unlimited growth, and have cell
walls made of cellulose (used in making paper). Students should learn that most plants are green,
have roots, grow, have flowers, have leaves, live in soil, and drink
water. They do not move from place to place on their own. Plants provide food and shelter for many other
organisms. While this project focuses on plant growth, it also looks at
plants as habitats for animals. A habitat meets all the environmental
conditions an organism needs to survive. In our case, the milkweed plants
students will study for plant growth also provide a habitat for the
monarch butterfly caterpillar. At the end of this year, students will
plant their plants in the garden, providing an increasing monarch
butterfly habitat at the school. PROCEDURE: Student teams will follow the same plant
throughout the year unless there is a problem. For instance, if one of the
plants dies or is broken off, another plant can be used and the students
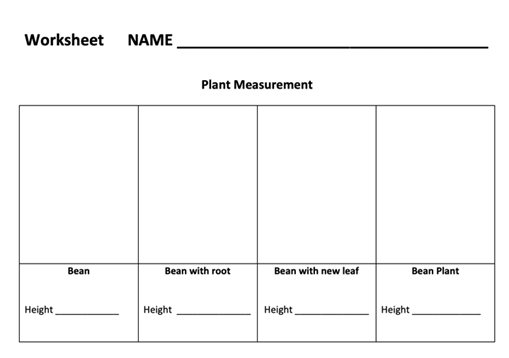
will note in their journals that they have switched plants. 1.PRACTICE MEASURING WITH PLANT MODELS – Using the
plant models, teachers review what happens at each stage of plant
development (see Additional Detail for Plant Measuring Lesson, below, for
detail of each stage). Students will put the models in order of growth.
Next, students use a ruler to practice measuring plant height. (They
should use centimeters instead of inches.) They need to make sure the 0 on
the ruler is down. If the plant does not show above the ground, the
measurement should be recorded as 0 cm (first model). After measuring,
they should enter their measurements on the plant model worksheet and draw
the plant at each stage. Review with students what measurements they have
for each stage. Since they are using models, measurements should all be
the same. If they get a significantly different number, they should try
measuring again, as they might be holding the ruler wrong.
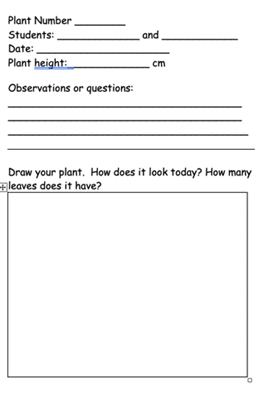
2.Assign a plant number to each pair of students.
Students will work in pairs to measure their individual plant. Each
student has a lab booklet to fill in. The lab booklets have room for
students to write their observations about the plant and any organisms
they find on the plant and to draw their plant. 3. MEASURING LIVE PLANTS – Go to the milkweed
plants and have students measure their plant height and put it in their
data booklet. To get accurate measurements, make sure students hold the
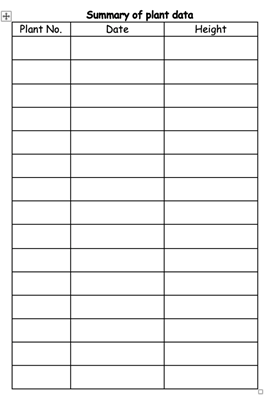
ruler/meterstick vertically and do not push it into the dirt. Students should enter plant height in their
booklet on the daily page as well as on the back page summary (see images
below).
5. GRAPHING THE DATA – Eventually students will
plot the plant height data on a line graph. This should be done at least
every three months. At the end of each graphing event, you can compare the
data sheets of each plant. Students should look for patterns. Are they all
growing fast during similar months? Are they all slower in different
months? Do any have particular problems like insects eating them? Did that
affect their growth?
|