|
|
|
| Decomposers and Biogeology | |
|
|
|
|
|
|
| Decomposers and Biogeology | |
|
OBJECTIVES:
VOCABULARY:
MATERIALS:
VIDEO
“Earthworm:
Cocoon Formation”
https://www.youtube.com/watch?v=sS_dK7fWvoA
“Live Worm Birth” https://www.youtube.com/watch?v=huWOOOZY6RY earthworm hatching (shows 3 worms coming out of a single egg). You also get sense of scale since there the egg is clearly about same size at tip of a ballpoint pen)
BACKGROUND: The environment is full of different animals with
different needs. Students should learn early how these organisms are
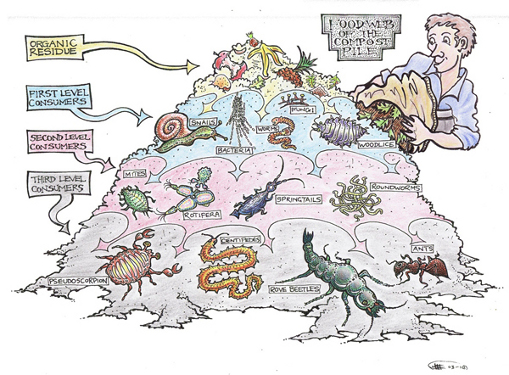
grouped. Every organism needs to find food, which is the
basis of the food chain (single chain) and food web (many chains).
In food webs there are many layers.
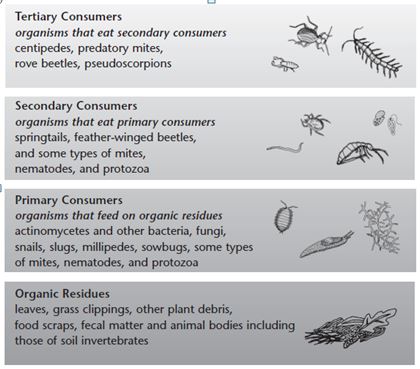
There are decomposers who make areas ready for producers to grow.
Decomposers can use their eating habits to produce heat (bacteria,
actinomycetes) that further break down organic debris that helps other
organisms like fungi to adsorb nutrients. There are many different food chains in a specific
area. If an organism relies solely on one organism for food, the
first organism will be in trouble if the second dies out.
Individual organisms, however, prefer specific food, but they
usually vary their diets depending on what is available. The food
chain refers to "who eats whom" relationship. For instance,
humans eat hamburger which comes from the meat of a cow, which eats only
grass (herbivore). But humans don't only eat meat, they eat many
other items that come from both animals and plants (omnivore). If
you plotted the entire food habits of an organism this would be called a
food web.
PROCEDURE:
3.
Hand out the plastic models and
see if students can identify them on the Lab Worksheet (Compost
Organisms). Some they may be
familiar with like beetles and worms, and others like Fungi and
Actinomycetes, might be
foreign to them. Key concept: many little organisms are
responsible for decomposition on the Earth's surface.
4.
Hand
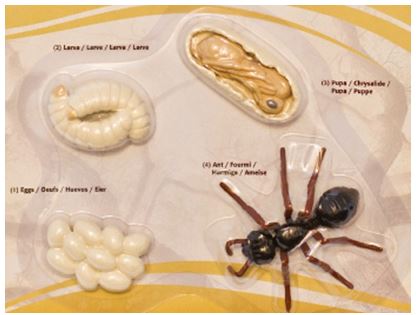
out models of “Life Cycle of Worms,” and “Life Cycle of Ants.”
Ants (Insect) and Worms (annelids) are very important in cool
composting. Use worksheet to put the
models on the correct phase. Read the information below.
These animals are
some of the most important organisms that gets soil ready for plants to
grow. Ants are one of the few
animals that can digest wood (as students will learn later)
and worms help to churn up the ground and add nutrient as they go
their life cycle.
Students studied ants in the 3rd grade, so this should be a review.
Spend more time on worms as this is new.
Students studied ants in the 3rd grade, so this should be a review.
Spend more time on worms as this is new.
LIFE CYCLE OF ANTS
Eggs: (Can
change the information to your comfort level.) After mating, a princess ant is considered a queen ant.
She finds a good nesting site to start a colony, where she lays
thousands of tiny eggs. She
won’t leave the nest until the first generation of worker ants are ready
to search for food. Once her
colony is established, a queen ant may lay thousands of eggs each day.
Larva:
Eventually, ant eggs develop into larvae, which resemble tiny
pieces of rice. They have no
eyes, only a mouth and they are fed by worker ants that bring food to the
nesting site. It takes
between a week and a month for eggs to turn into larvae, depending on the
species.
Pupa:
A few weeks to a month after becoming larvae, the growing ants will
be ready to spin cocoons, called pupae.
Within a week or so, pale yellow ants will emerge.
They turn their normal color once their exoskeleton hardens.
A queen’s first batch of ants will be smaller because they have not
been fed by other worker ants within the colony.
Ant:
Once its exoskeleton hardens, an ant is ready to begin supporting
the colony. Worker ants are by far the most common, but some ants can also
develop into soldier ants, drones, or princesses.
The worker ants have distinct tasks, including caring for eggs,
finding food, or expanding and maintaining the colony.
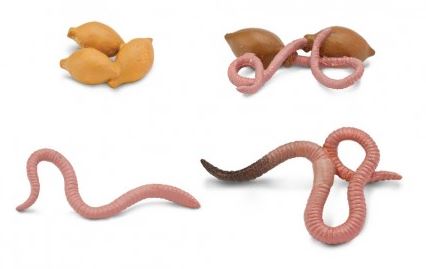
LIFE CYCLE OF WORMS
Earthworms are hermaphroditic, meaning they have both male and female
characteristics, so they can both fertilize and lay eggs.
Eggs are contained in a sheath (clitellum)that slides off the worm after
fertilization. The sheath
becomes a cocoon that is deposited in the soil, where it hardened to
protect the eggs inside.
NOTE:
The eggs and cocoons in the model sets are not to scale, eggs and
cocoons are much smaller --see
videos.
Hatchling:
Worm hatchlings emerge from their protective cocoon at different rates
depending on the species, but the range is from three weeks to five
months. Temperature and
moisture also impact the amount of time it takes hatchlings to emerge.
Only a few hatchlings survive to exit the cocoon.
Juvenile Worm:
Depending on the species, it takes anywhere from 10 to 55 weeks for worms
to mature. They grow daily
and are mature once they have the ability to lay and fertilize eggs.
Worms:
5.
Play the “Earthworm:
Cocoon Formation” video. Play
this video with the sound off and just talk through through the
stages. Video has great
visuals for cocoon formation and worm birth but the narrator talks very
slowly and has a very monotone voice.
It does show the size of the cocoon compared to the size of the
worm (about the size of the last couple segments after the clitellum falls
away).
https://www.youtube.com/watch?v=sS_dK7fWvoA Play the worm
hatching video
https://www.youtube.com/watch?v=huWOOOZY6RY
from 1:00 min to 3:00 and stop.
They will get to see three worms hatching from a single worm
cocoon.
6. Find
some worms from outside and put a few at each table. Students can use
hand lens to look at worm parts in detail.
You need to find worms ahead of time.
If you get them ahead and keep them in dirt you may get some worm
eggs for students to look at. Ideally
you would need a clear container tso students can look at the worms.
If you take worms out of dirt to look at, they should go back in
dirt between classes or they will get too dry.
If you see some
worm cocoons, you can set up a couple of microscopes in the back so
students can take turns looking at them under the microscope.
Sometimes the multiple baby worms are visible moving around inside
the cocoon.
|

 Decomposers
interact with the lithosphere (rock layer) and the biosphere (life).
They not only break down organic matter but they mix into the rock layer.
This is called biogeology.
Decomposers
interact with the lithosphere (rock layer) and the biosphere (life).
They not only break down organic matter but they mix into the rock layer.
This is called biogeology. 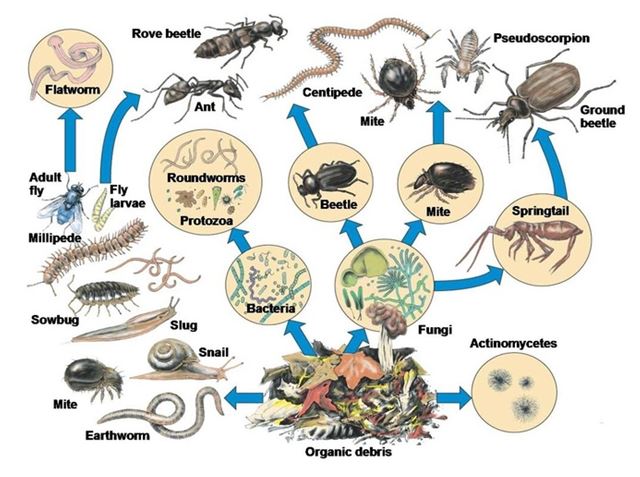
 Eggs:
Eggs: