BACKGROUND:
A map is a flat sheet of paper, but the surface of the Earth is not flat
at all. Maps are two-dimensional, while the Earth’s surface is
three-dimensional. Maps use contour to show elevation above sea level. Maps
with contours are called topographic maps.
To help visualize how the shape of the surface is shown on a map,
visualize an island in the ocean. The island is surrounded by water, and the
line around the island where the water touches it is all at the same
elevation or sea level. Next imagine a line 25 feet above sea level that
goes all around the island. This line of constant elevation is called a
contour line. It also shows the shape of the land at that level. The 0
contour would be the shore line.
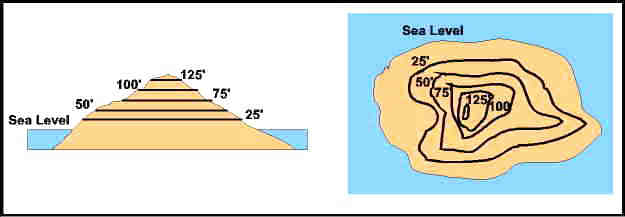
Contour lines on a make believe island. Sea level is the 0"
contour.
On a topographic map, the vertical distance between contour lines, called
the contour interval, stays the same. For the island example, the next
contour line after the 25 foot line would be at 50 feet. This line would be
created by connecting all the points 50 feet above sea level. If the island
were 130 feet tall, 75, 100 and 125 foot contour lines would also be needed.
The 125 foot contour line will probably be almost a circle and very small
because there is only 5 feet of island left above it. This tells you that
anything inside a closed contour line is higher than the elevation of that
line, and anything outside is lower.
The meaning of contour lines on
topographic maps is a difficult concept to convey to students. Some students
with an eye for form will have no difficulty, but the majority of students
will have problems. A good way to introduce the concept of contours is for
the students to figure out on their own how to make a 2 dimensional
representation from a 3 dimensional object.
PROCEDURE:

- Explain the concept and purpose of topographic maps to the students.
You may wish to use the island example and drawing above.
- Introduce the image maker to students. Make sure you go over the
precautions because once the students can "play" with it, they
will. The precautions include:
- The pins are blunted for safety, but never make an image of your
face with your eyes open.
- Never force the pins.
- Keep out of reach of small children.
- Never grab the product while someone is using it.
- Tell students they are going to construct try and figure out a
system to make a three dimensional object into a map.
- Set up the image maker, by putting an object under the Image Maker so
it looks like an island. You can simply crush a piece of paper into an
island shape.
- If you only have one image maker, have the students do this activity
throughout the day. Each student should get a piece of wax paper so they
can put the wax paper over the imagine. Have a wax pencil available so
they can draw their model. Have the students try and see if they can
make a map out of the shape. Some students will realize that if you look
straight down you can see "contours." The pins that are at the
same elevation represent the contours. Make sure the students draw what
they see without adding any shading. They must draw a flat
representation to accurately show the image in the Image Maker.
- Have students write their name on their attempt. When they are
completed go over them to see if any of them used contours. Discuss some
of the various other ways students may have used.
|