BACKGROUND:
  Describing your location is very important if you want
to tell someone where you are. On a map, the east-west lines of latitude and
the north-south lines of longitude give every point on the map a unique
location. They divide the Earth into a grid, that is visible on the inflatable
globes. Each line in the grid is given a "number" which helps us
to locate our position. Describing your location is very important if you want
to tell someone where you are. On a map, the east-west lines of latitude and
the north-south lines of longitude give every point on the map a unique
location. They divide the Earth into a grid, that is visible on the inflatable
globes. Each line in the grid is given a "number" which helps us
to locate our position.
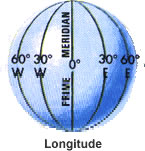
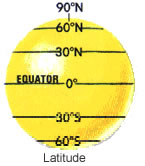
Lines of latitude are parallel to each outer. They run
east_west around the globe. We measure latitude starting at the equator. The
distance from the equator to the North Pole is 1/4 of the distance around
the Earth. So the North Pole is at 90 degrees north latitude. Lines of
longitude converge in the north and south pole and are not parallel. This
distance is measured in degrees. Earth, as a circle, is divided into 360
degrees (360o).
In this exercise students start to think about how to
locate themselves. They are introduced to the terms and meaning of latitude
and longitude. However, rather than working with these terms in detail, the
main thrust of the lab is to get the students to recognize geographic
directions.
PROCEDURE:
- Have the students look at the Inflatable World Globes. Have them find
the lines that go from the North Pole to the South Pole (longitude
lines) and the lines that go across the globe, parallel to the equator
(latitude lines). Tell them that these lines help to find where you are
on the Earths surface. Explain that without these lines, it would be
difficult to find locations. Explain that the lines can look all the
same if you do not somehow make a system that identifies them.
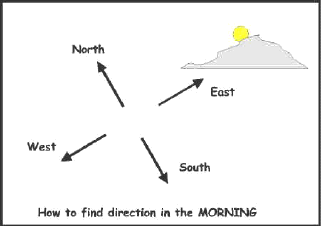
- Explore the directions of North, South, East and West with the class.
Ask the students how they would recognize these directions. Use the
diagram below to show them some simple clues for finding these
directions. Draw it on the board as you explain the following
information:
- The Sun and Moon both appear to rise in the eastern sky and appear
to set in the western sky (we say "appear" because it is
actually the Earth rotating that causes this effect). East and west
are thus opposite directions.
- If you are facing the east, your left hand points to the north and
your right hand points to the south. These directions are opposite
too.
Have the class locate north in the classroom by using this method.
You may wish to determine North in advance, by either locating the Sun
in the morning or by using a compass. The idea is for students to learn
the general direction of north. Tell them that north is not
"up" and south is not "down". This common
misconception makes it seem that north is toward space and south is
inside the Earth. Make sure the students understand that geographic
directions run along the Earths surface.
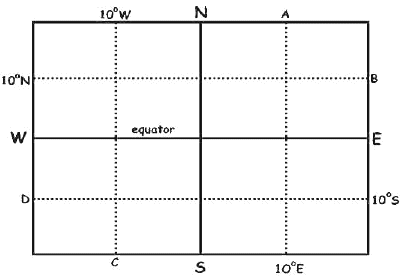
- To better illustrate how to divide a map into sections, hang string in
the classroom to symbolize lines of longitude and latitude (if you do
not want to use string you may want to use the floor tiles as a guide,
if your room has them). Longitude lines will go from north to south.
Latitude lines will go east to west. As shown in the diagram below,
divide the classroom into four sections, using N-S and E-W lines. Label
the E-W line "Equator". Further divide each quarter of the
classroom with two more strings. Label these as show in the diagram. Put
up signs to illustrate how to identify the lines. This simplifies
latitude and longitude, but gives the students a feeling of how
the system works.
 |
|
Divide the
classroom into N, S, W, and E. |
You may wish to have the students put up the string and signs. If you
have crepe paper left over from another project, you may want to
decorate the classroom with latitude and longitude streamers.
- Have the students try to find their desk on the lab sheet. Go over
that the N10E longitude line refers to line A, N10E latitude would refer
to line B, S10W longitude is line C, and S10W latitude is line D. The
students should not try to plot points, which is an upper level skill. They
should just try to get a sense of direction.
If the students are having a hard time, try to have them remember
that "N" latitude means from the equator north, "S"
latitude means going south from the equator. "E" longitude a
line east of the N-S line in the classroom. "W" longitude is a
line west of the same N-S line.
- Have them locate other different items in the class so they start to
fill up the grid with items that are in the classroom.
|