BACKGROUND:
Minerals are naturally occurring, inorganic
combinations of one or more elements. Minerals are crystalline, which means
they have an internal atomic structure organized in a regular, repeating
pattern. Organic substances can also form crystals, however, these are not
minerals.
|
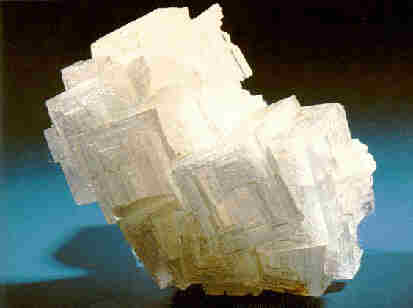
halite
|
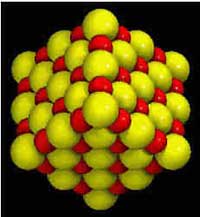
The natural growth (shape) of a mineral is called its
crystal form. This shape is based on the internal arrangement of atoms
although not visible to the eye, is reflected by the minerals appearance.
For example, halite (salt) occurs in cubic crystals because the sodium and
chloride atoms which compose halite are organized in a cubic structure.
Minerals show recognizable crystal forms only when they have open space to
grow. This is uncommon; most minerals form in confined spaces, and take on
the shape available to them.
PROCEDURE:
- Remind the students that minerals grow as crystals. Tell them that
today they are going to grow crystals.
- In this experiment, students will make a solution that will grow into
a "garden" of crystals. Note that not all crystals are
minerals. For example, solid sugar is crystalline, but is organic, so it
is not a mineral.
Use the following recipe for the crystal solution. Make the
appropriate amount for your classroom if you do not want your students
to mix their own solutions. WARNING: The use of ammonia can be dangerous
around children. Per student, mix:
5 ml water
5 ml ammonia
5 ml laundry bluing
5 ml salt
- Have the students carefully place several small pieces of sponge,
porous rock or broken brick in their jars. We prefer white porous rocks
(available at nurseries), because they make the garden look attractive.
Make sure the rocks are no more than 1cm. high.
- Pour enough of the mixture into the jar to almost cover the rocks.
Leave a 5 mm air pocket at the top of the jar.
- Add a few drops of food coloring to make it "pretty."
Students can put one drop of red, one drop of blue on the rocks. Do not
put 2 different color drops on each other. Do not add more than 4-5
drops.
- Place the jar in a warm (but not hot) area, such as the sunny part of
a windowsill. Crystal growth rate depends on temperature. The lower the
heat, the slower the crystals will grow. However, slow growing crystals
will become larger than fast-growing crystals. You many want your
students to experiment by putting some jars in warm parts of the
classroom and some in the cool parts.
- Crystals will form and become visible within a week. If the sponges or
rocks dry out, you can get the crystals to further grow by adding a
mixture of equal parts water and ammonia to the fluid around the rocks.
Add the mixture carefully, a little at a time.
- The crystals formed are very delicate, so do not let the children move
the jars until the assignment is completed. If the children bring the
jars home, tell them to carry them very carefully.
- Ask the students to observe the jars each day. They should record what
they see by drawing pictures in the boxes on their worksheet.
- If the students put different types of rocks on the bottom of their
jars, the class can also observe and discuss what type of base makes the
best crystals. Likewise, if the jars were placed in different parts of
the classroom, the class can observe and discuss why some crystals grew
better or larger than others.
|