BACKGROUND:
After it erupts ,a volcano leaves evidence of its
activity. These clues are the rocks that were created from molten rock, or
magma, erupted by the volcano. These rocks are all igneous rocks. If they
are associated with the volcano, they are called volcanic rocks.
Volcanic rocks are a subset of igneous rocks. If the magma cooled and
hardened inside the earth, they are called plutonic rocks.
Rocks from volcanoes can be very different. They can
be light in color and weight, or they can be dark and heavy. Students have
to learn to become familiar with volcanic rocks by examining them. This is
generally true of all rocks. The more a child sees and feels rocks, the more
that child can associate a name with its characteristics.
Scientist name volcanic rocks in ways that describe
their composition, how they erupted, and how long it took them to cool.
Students will learn some of these names and their meanings in later grades.
PROCEDURE: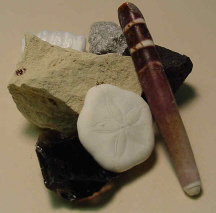
- Volcanoes are "hills or mountains" made of once melted rock
that have cooled and hardened. However, all hills and mountains are not
volcanoes. Ask students to develop a description of the environment
where volcanoes form (i.e., hot and fiery places). If possible, show
students pictures of volcanoes to help them develop descriptive terms.
- In your module (Plate Tectonics - Volcanoes (K), there are bags containing small pieces of rock and
other materials, including basalt (black rock), pumice (gray, light
rock), obsidian (shiny black rock), diatomite (white rock), sea cookies
(star on a white disc), a sea urchin spine (long, narrow), and pieces of
Styrofoam. Divide your class into working groups. Give each group a bag
and a hand lens or reflecting light microscope. Instruct the students to
separate the items they think are derived from volcanoes. Have them
examine their specimens with magnifying lenses. If you wish, you can
make you own module with your own rocks and items. (Remember you
can customize this mixture.)
- As a class, discuss each item. State whether or not it comes from a
volcano. Be sure to discuss how the students arrived at their answers.
They may say that volcanic rocks will look like "rocks" -
hard, not easy to break and usually dull looking. The volcanic rocks in
your module are basalt, pumice, and obsidian. The sea cookie, sea urchin
spine, and Styrofoam are not from a volcano, nor are they even rocks.
Diatomite is the only item that may give students a problem. It is a
rock, but it is not volcanic. A hint that you can use to explain this is
that diatomite breaks apart very easily, and most volcanic rocks do not.
(Remember these are simplifications). Students will learn more complex
criteria in the upper grades.
Students love to observe the sea cookie in more detail. If you wish,
have them examine it in detail to reinforce their observational skills.
They can describe the 5 part symmetry on the top of the sea cookie.
Instruct them to look underneath the sea cookie. They will see two
holes. One hole is the mouth and the other is the anus or
"poop" hole. Ask students if they know which way the sea
cookie moves, mouth first or anus first? The answer is mouth first
because the sea cookie doesn’t want to eat their own poop!
- Emphasize with the students that rocks from volcanoes were once melted
and there are many types of volcanic rocks. Remind them that they are
just beginning to learn about rocks. Exposure to samples of volcanic
rocks will help students distinguish and learn more in later grades.
|