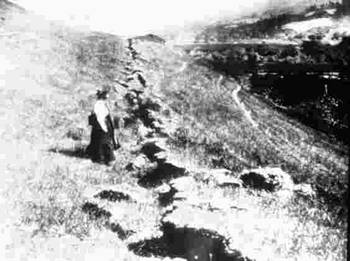
BACKGROUND:
This lab is designed to stimulate discussion of what to
do during an earthquake. Letting the students play the part of a mayor will
help them realize that they may have to assume responsibility in case of a
major disaster. The important points of the lab are that during a weak to
moderate earthquake, the mayor should check with the local agencies and the
hospitals. However, during a strong earthquake almost all aspects of the
city have to be looked at to see if they survived the event intact. Areas
such as shopping centers, hospitals, roads, and homes must be examined in
order to determine if their use is safe. Utilities and other services must
also be evaluated.
PROCEDURE:
- Explain and contrast the effects of moderate and severe earthquakes to
the students. Have the students suggest how damage levels would differ
between the two levels of shaking. You may also want to include a brief
discussion concerning aftershocks. Aftershocks may happen after a big
earthquake. Many times you have to be careful of these smaller
earthquakes, especially the ones that occur within 48 hours of the
initial earthquake.
- If necessary, construct Primary Shaker Tables or shaker boards before
the lab begins. The Primary shaker table can control the different
intensities better, but the shaker board is a more correct analog
because it can shake in many directions. If your class is familiar with
lab procedures, we recommend the shaker boards. Directions are given
below. Make enough tables for the students to work in groups of 2 or 3.
Here are directions:
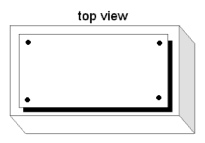
HOW TO CONSTRUCT A PRIMARY SHAKER TABLE
If necessary, construct Primary Shaker Tables or shaker boards before
the lab begins. The Primary shaker table can control the different
intensities better, but the shaker board is a more correct analog
because it can shake in many directions. If your class is familiar with
lab procedures, we recommend the shaker boards. Directions are given
below. Make enough tables for the students to work in groups of 2 or 3.
Here are directions:
Materials:
8 long stemmed brads or nails
4 strong, thick rubber bands
marbles
cardboard box with lid
string
plastic container lid
Directions:
- Cut a section from the cardboard box lid so that it will fit
inside of the cardboard box as shown in the picture below.
- Take 4 brads and insert them from the inside of the cardboard box
so that the stems fall outside of the box. Insert the remaining four
brads into the cut lid of the box. Make sure that the brads are not
directly on the edge as this will cause the lid to tear when it is
pulled.
- Fasten the rubber bands to the brads inside of the cardboard box.
Fasten the other ends of the rubber bands to the brads on the cut
lid. Leave the lid inside of the box.
- Place several marbles in a container top. Put the marbles in their
container under the cardboard lid in the box, to allow it to move
freely when up or down.
- Make a small hole in one end of the box. Attach a piece of string
to one end of the lid and. insert the opposite end of the string
through the hole in the box. This moves the lid. Don't forget to tie
a knot at the end of the string where comes out of the box. This
will prevent it from going back inside. Your "primary shaker
table" is complete.
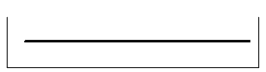
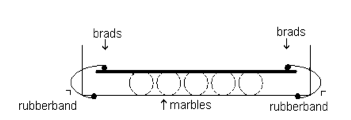
HOW TO CONSTRUCT A SHAKER BOARD
- Cut particle board or use a heavy wood into 12
x 18 inches. The thickness should be about 3/4 inch thick.
- Place the marbles in the plastic top. The
marbles will act as ball-bearings in the experiment.
- Balance the shaker board on top of the marbles.
This completes the shaker table.
- Demonstrate how the shaker table or shaker board works to the class.
When it is "jolted", it simulates the movement of the Earth's
surface (an earthquake). The earthquake creates energy that moves along
the surface of the shaker table as waves. Control the
"intensity" by how fast you shake the board. Demonstrate to
students that a strong earthquake occurs when you shake fast; a weak
earthquake occurs when you shake it less violently; a moderate
earthquake occurs when you shake it somewhere in between.
- Divide the students into groups. Instruct each group to make a little
village on the shaker table. Illustrate to them how to shake the village
at the different intensities. Have the students rebuild the village in
exactly the same way after each demolition. After each shaking, review
what happens to the village. Discuss what happens after a strong,
moderate, and weak earthquake. The conclusion should be that the higher
the intensity, the more the damage to the homes. A small earthquake,
which most earthquakes are, causes very little damage. You may want to
tell the students that earthquakes only cause damage where homes and
buildings are not constructed to withstand shaking.
- Have the students complete the worksheet. Have them decide what the
mayor should be concerned about after each mock earthquake. The list
includes structures that may need to be evaluated, as well as government
agencies to contact. There is room on the lab sheet to include other
areas of potential concern, as well as additional agencies to contact.
You can look on the Internet or in the telephone book, under
"GOVERNMENT" to find the appropriate agencies, which you
should write in on the lab sheet.
|