On October 17, 1989, a Magnitude 7.1 earthquake
occurred south of San Francisco, California. The resulting disaster was not
the largest in the history of the United States, in terms of either money or
lives. In this Post Lab, students will construct a paper model of the 1989
fault rupture. This model will help students visualize the process of fault
movement during earthquakes. By examining this model they can better
visualize the complexity of faulting during an earthquake. This paper model
is from U.S. Geological Survey Open File Report (89-640 B) by T. R. Alpha,
J. C. Lahr, and L. F. Wagner. The version below includes the model and
instructions; the Report also includes background information.
 The
first place along a fault to break during an earthquake is called the focus.
The focus is always located within the Earth. The point on the Earth’s
surface directly above the focus is the earthquake’s epicenter. During an
earthquake, movement proceeds very rapidly from the focus along the fault.
The total area that moves is often called the rupture. The size of the
rupture is controlled by many factors, such as the amount of energy stored
along the fault, the strengths of the rocks involved, and the orientation of
the fault. Generally, the larger the rupture, the bigger the earthquake.
Ruptures do not always break through to the Earth’s surface. In this
situation, the surface above the fault is torn or bend by fault movement.
This is what happened in most locations during the 1989 Loma Prieta
earthquake.
The
first place along a fault to break during an earthquake is called the focus.
The focus is always located within the Earth. The point on the Earth’s
surface directly above the focus is the earthquake’s epicenter. During an
earthquake, movement proceeds very rapidly from the focus along the fault.
The total area that moves is often called the rupture. The size of the
rupture is controlled by many factors, such as the amount of energy stored
along the fault, the strengths of the rocks involved, and the orientation of
the fault. Generally, the larger the rupture, the bigger the earthquake.
Ruptures do not always break through to the Earth’s surface. In this
situation, the surface above the fault is torn or bend by fault movement.
This is what happened in most locations during the 1989 Loma Prieta
earthquake.
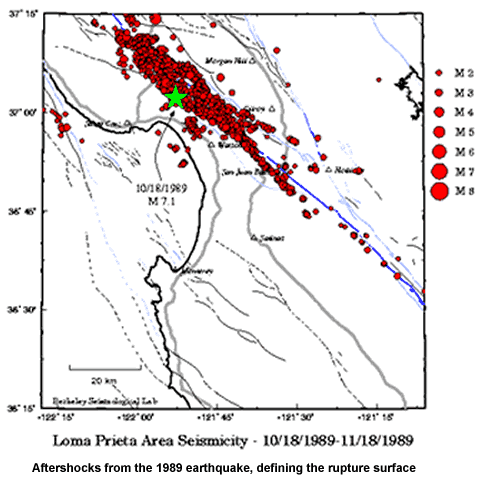
Here is a detailed description of the Loma Prieta
earthquake and associated surface movements, from the Open-File Report by
Alpha, Lahr, and Wagner:
"The northern California earthquake of October
17, 1989 occurred in the Santa Cruz mountains between San Francisco Bay and
Monterey Bay. It was named after Loma Prieta, a nearby mountain peak. The
focus, the point where movement began within the Earth, was on the San
Andreas fault at of depth of 18 kilometers. The break expanded rapidly along
the fault plane, moving at approximately 12,000 km/hr (7,000 mi/hr). It
extended upward to within 6 km of the surface and along the fault for 25 km
to the northwest and 25 km to the southeast. With respect to the North
American plate, the Pacific plate moved northwest 1.6 meters and upward 1.1
meter at an angle of 70 degrees during the event.
Because the main fault rupture, or break, did not
continue all the way to the surface the upper layers of the earth were bent
rather than broken. An area of fissures, or deep cuts in the earth, mapped
near the north end of the rupture may have been a result of this bending. In
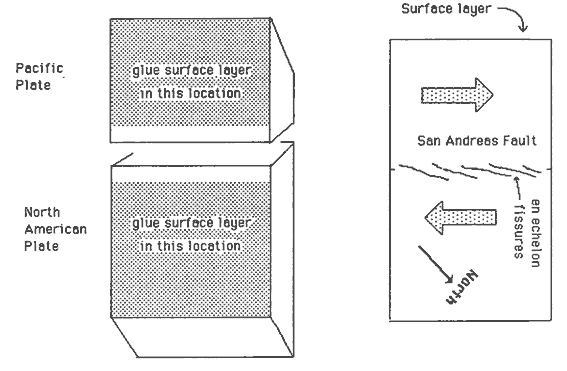
the paper model a series of cuts, which form a stepped or "en
echelon" pattern are placed directly above the fault rupture. These
cuts were caused by the motion on the fault below them . They illustrate how
surface layers might be deformed by underground fault movement. The actual
pattern of bending and fissures, however is more complicated and is not
portrayed by the paper model."
PROCEDURE:
- Explain fault movement and surface rupture to the
class. Give them background information on the 1989 Loma Prieta
Earthquake.
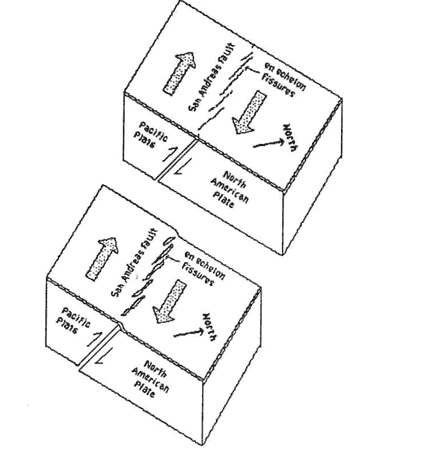
- Have the students cut out and construct the paper
model. When they have finished, have them simulate the earthquake
displacement by shifting the "Pacific Plate" box upward and to
the north. Have the students closely observe the surface of the model;
they should see how the fissure buckles in an en echelon pattern.
MAKING A PAPER MODEL OF THE 1989 LOMA PRIETA EARTHQUAKE
INSTRUCTIONS:
- Cut out all three pieces of the model (see
following pages for instructions).
- Fold the two large pieces into box shapes, as
illustrated. Make sure you fold all the areas before you start gluing.
- Glue the tabs of the two boxes and assemble them.
- Glue the surface layer to the tops of the two
boxes. Be careful that the area of the fissures remains glue free.
- To simulate the earthquake displacement, shift
the "Pacific plate" box upward and to the north. Notice how
the fissure buckles.


Finished Model