BACKGROUND:
The crust of the Earth moves when force is applied to
it. Earthquakes are caused by stresses from plate movement, and to a much
lesser degree, from the movement of magma in the crust and upper mantle of
the Earth.
Students should understand that stress within the
crust of the Earth can "relieve" itself by giving off energy
(earthquakes). This energy is released in the form of seismic waves. These
waves make the whole Earth ring like a bell as the travel throughout the
Earth. The movement of these waves within the Earths crust can cause
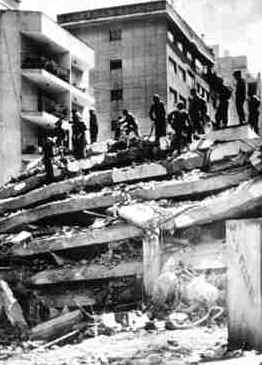
minor to major damage to structures on the surface of the Earth, especially
close to the origin of the earthquake. The damage depends on the intensity
of the original stress and its dissipation as it travels through the crust.
Earthquakes are caused by the sudden movement and
fracturing of rock masses along preexisting faults. A fault is a broken
surface within the Earths crust. The point on the fault at which the
displacement begins is called the focus of the earthquake. The point on the
surface of the Earth directly above the focus is the epicenter. Your
students need to understand that an earthquake happens in rocks that have
been stressed. This stress is stored until the strength of the rock is
exceeded. The actual break (the earthquake) then releases the energy in the
form of seismic waves.
The more energy that is released the more severe the
shaking will be. Seismologists (scientists that study earthquakes) use
different ways of measuring the intensity of an earthquake. One method is
the Richter Scale, which measures the size of the waves released by the
earthquake. The larger the number, the more energy is released.
When an earthquake occurs, the shaking indicates that
an earthquake has released energy. This activity will have the students
experience different simulations of earthquake intensities and how it
affects homes.
PROCEDURE:
-
Construct primary shaker tables before the activity. Make enough
tables for the students to work in groups of 2 or 3. Here are
directions:
HOW TO CONSTRUCT A PRIMARY SHAKER TABLE
The primary shaker table is an
inexpensive, but useful tool for demonstrating weak, moderate, and strong
earthquake damage to children. It is called a primary shaker table because
it can move in only one direction. It is thus not a fully correct analog to
the many directions of motion in a real earthquake. However, the primary
shaker table is an excellent visual tool to help small children can
understand that earthquakes vary in both intensity and damage
Materials:
8 long stemmed brads or nails
4 strong, thick rubber bands
marbles
cardboard box with lid
string
plastic container lid
Directions:
-
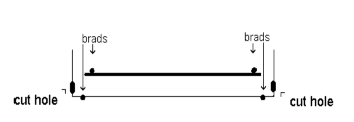
Cut a section from the cardboard
box lid so that it will fit inside of the cardboard box as shown in
the picture below.
-
Take 4 brads and insert them from the inside of the
cardboard box so that the stems fall outside of the box. Insert the
remaining four brads into the cut lid of the box. Make sure that the
brads are not directly on the edge as this will cause the lid to tear
when pulled.

-
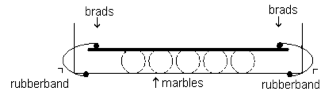
Fasten the rubber bands to the brads inside of the
cardboard box. Fasten the other ends of the rubber bands to the brads
on the cut lid. Leave the lid inside of the box.
-
Place several marbles in a container top. Put the
marbles in their container under the cardboard lid in the box, to
allow it to move freely when up or down.
-
Make a small hole in one end of the box. Attach a
piece of string to one end of the lid and insert the opposite end of
the string through the hole in the box. This move the lid. Don't
forget to tie a knot at the end of the string where comes out of the
box, this will prevent it from going back inside. Your "primary
shaker table" is complete.
-
Demonstrate how the shaker table works to the class.
When it is "jolted" it simulates the movement of the Earth's
surface (an earthquake). The earthquake creates energy that moves along
the surface of the shaker table as waves. Control the
"intensity" by how fast you shake the board. Demonstrate to
students that a strong earthquake occurs when you shake fast; a weak
earthquake occurs when you shake it less violently; a moderate
earthquake occurs when you shake it somewhere in between.
- Divide the students into groups. Instruct each group to make a little
village on the shaker table. Illustrate to them how to shake the village
at the different intensities. Discuss what happens after a strong,
moderate, and weak earthquake. Emphasize the difference between the
shaking events by comparing how and when the toys fell. During your
discussion, relate your discussion back to the Pre Lab. Explain that the
movement of the boards is like the person jumping into the tub, creating
energy.
As the energy waves hit the village with enough force it will knock down
the village. To make it more dramatic for the students, have the groups
shake their tables together and say "strong, earthquake, a lot of
energy," or "moderate earthquake, not too much energy,"
or "weak earthquake, little energy."
- After each shaking, review what happens to the village. At the end of
the lesson, go over each of the earthquakes and compare the effects of
the different intensities. The conclusion should be that the higher the
intensity, the more the damage to the homes. A small earthquake, which
most earthquakes are, causes very little damage. You may want to tell
children that earthquakes only cause damage where homes and buildings
are not constructed to withstand shaking.