BACKGROUND:
The constituents of soil are extremely variable in size,
shape and chemical composition. The size of particles is one of the
most significant characteristics. Water absorption, air movement,
rate of solution and ease of tillage are a few things that are affected
by particle size.
The texture of soil refers to particle sizes and
is classified on an arbitrary scale. It can be coarse, sandy, or
clayey. Sand would be about the size of sand, coarse would refer
to soil that is larger and clayey would be smaller. You can also
describe the structure of soil by how the soil particles tick together.
When particles are rather porous and small, the soil is considered to have
a granular or crumby structure, which is characteristic of many soils high
in organic matter. Soil that is lumpy stick together. Sometimes soil
has magnetite in it, a magnetic mineral that is attracted to a magnet.
Humus, the partially decayed organic matter accumulated in soils, is a
dark-colored structure less material.
Soil horizons can be different for high productive areas
versus low productive areas. The ideal soil horizon as shown in the Pre Lab, may
not be present in all areas. You can use the following to help guide
you with your students.
PRODUCTIVE
- contains more organic matter in most areas, most weathered
and leached at all levels, loose, easily tilled, fertile
- Yellow layer containing small quantities of clay and easily
penetrated by air, water, and plant roots
- slightly weathered, permeable, calcareous
NON PRODUCTIVE
- light gray layer, low in fertility and difficult to till
- heavy clay layer impermeable to air, water, and plant roots,
massive stable aggregates of small particles
- heavy clay parent matter
PROCEDURE:
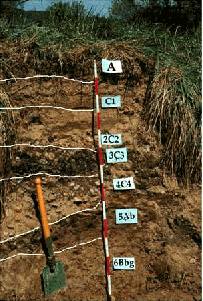
- A soil profile is a slice of earth several
feet deep that illustrates the layers of soil. Most soil profiles
have a surface layer of organic material and two or three layers of soil
layers with different characteristics. Students in this lab will
look at 4 samples representing ideal O, A, B, and C horizons.
- The second part of the lab is to go outside (if time
permits) and collect soil samples and then determine what horizon it
may be. If time is a factor, the teacher could collect the samples
prior to lab. Students should look at the different soil samples and try to assess which layer they belong
to, by describing the sample and predicting what soil horizon it may have
come from.
- Give students soil samples, magnet, microscope, and beaker
of water. It would be ideal to get local samples for this lab and
to record where the sample came from. They will only use the water for
samples collected by the teacher, the reference collection should only be
observed. It is difficult to dry soil samples.
- Instruct the students to look at the reference soil samples under
the microscope and describe what they see. They should ask themselves
if the sample has broken up rocks or very fine clay particles. They
should also see if there are other distinguishing characteristics like
plant debris or animal remains.
- If you have time you may want students to go outside
and dig a hole to see the soil horizon around the school. This may
be difficult in some areas. Students could collect some of the
samples. If not enough time is available, the teacher should
pre-collect the samples.
- Instruct students to put a little amount of the soil
in some water to see if anything floats. Plant debris that may not
have been obvious under the microscope may float.
- Use the magnet to see if there is any magnetite, which
is a magnetic mineral. You can use the magnet with the reference
collections. The presence of magnetite means that the parent
rock may have been granitic. Magnetite erodes out of the rock and
is left in the soil.
- Use the worksheet from the Pre Lab to determine which
horizon the sample may have come from.
|