BACKGROUND:
Owls swallow their prey nearly
whole, however, the fur and bones of their prey cannot be digested.
The food goes into the proventriculus which is found just before the gizzard.
(Owls do not have crops like many other birds.) As food starts to
digest in the gizzard, the muscles separate the fur from the bones.
The fur and bones are then pushed forward to the proventriculus.
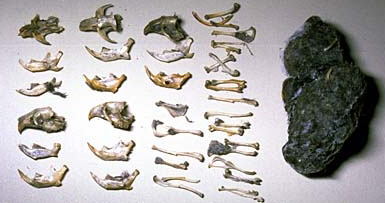
About 12 hours after eating their prey owls spit out a "pellet," an ellipsoidal
to spherical glob. Owl pellets are clean of all flesh and odorless.
The pellets that your students have
in the kit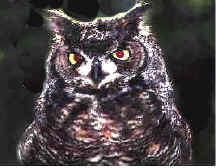 are from a wild Great Horned owl. This owl hunts rabbits,
rodents, and birds. The owl is about 18-25 inches in height.
The ear tufts are set wide apart, and the owl has yellow eyes. The
body feathers are a mottled gray brown in the upper body and a fine dark
gray horizontal barring below. The Great Horned has a deep resonant
hooting, "hoo, hoo-hoo, hoo." The materials for this kit are from
the San Francisco Bay area, but Great Horned owls range in all of North
America up to the northern tree limit. They build nests in trees,
crevices or cliffs with 2 or 3 white eggs. are from a wild Great Horned owl. This owl hunts rabbits,
rodents, and birds. The owl is about 18-25 inches in height.
The ear tufts are set wide apart, and the owl has yellow eyes. The
body feathers are a mottled gray brown in the upper body and a fine dark
gray horizontal barring below. The Great Horned has a deep resonant
hooting, "hoo, hoo-hoo, hoo." The materials for this kit are from
the San Francisco Bay area, but Great Horned owls range in all of North
America up to the northern tree limit. They build nests in trees,
crevices or cliffs with 2 or 3 white eggs.
PROCEDURE:
- Each pair of students
should get an owl pellet, a microscope or hand lens, a toothpick or tweezers or
any other instrument that can separate the bones from the pellets. Students
may use their hands, but caution them that the bones are little and not
to break them.
- Instruct students to separate
the fur from the bones and then have them look carefully at their contents.
Instruct students to record the information on their lab sheet. Point out to
students that on their lab sheet there are some clues to the type of mammal
that they will find in their sample. Use the enclosed sheet
so students can find what part of the animal the bone is from.
- Have the students put the remains
back in the bag, so they can be reused. If you want them to look
like when they were coughed up, put a little water on the material and
stick it back together. Make sure that you dry them up before you
seal the bags, otherwise it will get moldy. You should leave one pellet together, so students
can see what a complete pellet looks like.
If you have access to a local supply of owl pellets every year, you can
have the students paste the bones down and make a display. Label
the different bones. Owls are found just about everywhere, so look under trees
that you might hear a "hoot" during the night.
|