Life Cycle - Human Biology (KA)
Lab 

   
OBJECTIVES:
  • Discovering and locating parts of the body.
  • Making a body mask. 
VOCABULARY:
  • femur 
  • heart
  • kidney
  • lung
  • pelvis
  • stomach
MATERIALS:
  • butcher paper 
  • body cut outs
  • crayons
  • stethoscope

Students make a tracing of their body and find key organs.


BACKGROUND:

The bodies of all organisms are well-constructed.  It’s like a car.  If all parts are working well then the car will perform.  The human body is the same. If all parts are working then the body functions well.  Just as in the car, the older the human gets, the more prone the parts may break down.
 
Students will be locating the different body parts on their body listed below:

HEART - You can have the students try to locate it with a stethoscope.  The heart is a hollow organ slightly larger than a clenched fist.  
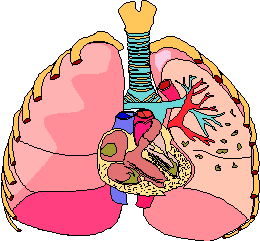
The heart is on the left side toward the center in a space between the lungs.

STOMACH - The stomach lies just below the lungs, and is a  reservoir for food.   

LUNGS - The lungs lie on either side of the heart and both are cone-shaped.  The lungs lie against the ribs.  When you breathe you can see your chest move where the lungs are.

FEMUR - The femur is the heaviest,  longest, and strongest bone in your body.  It is anchored to the pelvis.  

PELVIS - Protects the bladder which gets rid of wastes (urine).  It serves as a base by which the trunk of your body rests.  The legs are anchored to the pelvis.

KIDNEY - There are 2 kidneys below the stomach which are bean-shaped. Kidneys are  not fixed in rigid positions, they move as you breathe.  The kidneys remove water with waste products from other systems.

PROCEDURE:
  1. Locating organs on your own body by examining a model is not easy.  In this exercise the students learn about 6 different body parts and then locate them on their own bodies.

    Students should color their body parts.  Although it would be nice to have the students color the organs realistically, imagination at this age may prevent it!
      
  2. Trace the outline of a child on butcher paper and cut it out.  A parent's help can be very useful in this activity.
      
  3.  Discuss the functions of each of the body parts included with this activity.  Have the students color the parts and then cut them out.  The students are then to locate where they think the various body parts belong on their body masks.  Make sure that you give the students a major "clue" in your discussion (listed below).  Remember that it is difficult for students to find where the parts are located.  Give the students clues to help  locate the part by themselves.  Try not to point out the locations directly.

[Dictionary]   
[Back to Life Cycle Grid]  [Back to Human Biology (K)]