BACKGROUND:
Observation
is a trained skill. The
more practice students have in observing details, the better they will
be able to transfer the skill.
Students should be told that just to
know the name of an object, does not mean that you understand the
significance of that object. All people named "John"
or "Sally’" are not the same. They will all have
their own characteristics like size, age, and shape.
This lab helps the students to use scientific tools
to describe objects in more details. Students at
this age may not understand the significance of a magnifier or how
they are used. Magnification can help the students focus on
details and help them observe and describe better. Students need
to take time as they look at the entire object in detail.
A magnifier is considered a simple microscope
composed of one lens. Magnifiers enlarge objects by using the
properties of light. Different magnifiers will enlarge an object
differently, depending on the shape and size of the
lens.
PROCEDURE:
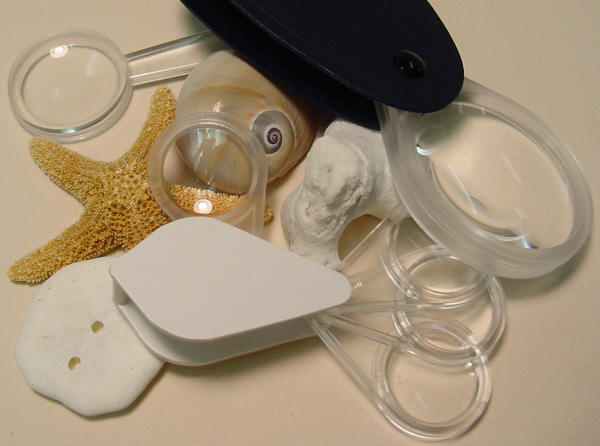
- If you have all the the components of
the kit, give each pair of students a bag
of sealife containing a sea cookie, marine snail, seastar, and coral.
(If you do not have these items find appropriate substitutes.) Have students look at the bag of items before they use the magnifying
glass. They can also draw what it looks like on paper or several
students can use the board.
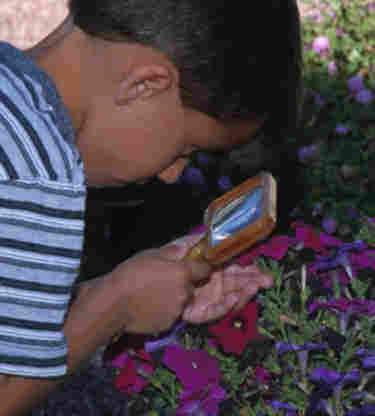
- Next, give each student a hand lens.
We suggest you put a string through the hole so students can wear
this one around their neck. Demonstrate how to use a magnifying glass. Tell students to put the
magnifying glass to one eye, and cover the other eye with their hand.
When they look at an object they should move the object, not the hand
lens. Most of your students will insist on moving the hand lens and it
may be hard to convince them otherwise. Remember, you are just
introducing the correct procedure. Don't demand it. After a while it
will become natural to look at objects that way. Students with glasses
may find it more difficult. Tell children that they are focusing
on an object to make it clearer. You may want then just to
look at their fingernail. Collect this magnifier after they
have looked at several items around the room or on their
body. .
- Instruct students to look at the
items in their bag of sealife. Make sure to explain the need of
detailed observations. Have selected students come to the board and
draw a picture of what they saw with the hand lens.
- Give students the chance to use all three
magnifiers labeled 3X, 5X, and 15x. Explain that the objective of the lab is
to see which hand lens, from a choice of several magnifiers in the
module, magnifies the largest. Don't tell the student the
magnification of each. Let them observe the sealife with all the
magnifiers. You may want the students to PREDICT which one they think
makes the larger image before they actually look. Most children will
predict that the larger the magnifier, the larger it magnifies. The
magnifier with the 3 loupes (15 x) makes the objects the largest; each
lens is 5x and when they are together you get the total magnification.
The largest lens is actually only three times magnification.
You may want to make a 1 cm dot and have the students look at it
with all three magnifiers after they have done the exercise.
This might make it clearer which magnifier creates the largest
image. .
- Have a discussion with the students
of their observations. When observing the sea cookie, they should be
able to see the little holes that are all over the organisms. The side
with the two large holes is where the mouth (one in center) and its
anus ("poop" hole) are located. The opposite side is where
the star shaped pattern is. The coral has little holes all over where
the individual coral "polyps" live. The clam lives in the
marine environment. The seastar is related to the sea cookie, and it
also has holes all over its structure. Little hair-like extensions
come from these holes when the organism is alive. The extensions help
the seastar move.