 A dry mount requires no water usually
used for inanimate objects. Depending on what you are mounting will depend on
how long they last. There are many ways to make dry mounts. Cutting
specimens with a razor makes the edges clean and straight so it is easy to
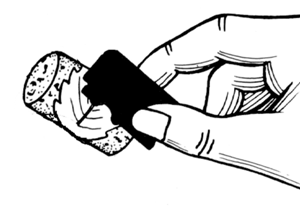
focus and attach. However, using a razor can be dangerous so using something
like cork can make cutting a specimen easier. Once the object is cut you can
use white glue or other mediums to glue the object to a stiff cardboard or
glass slide. In lab we will make a dry mount of two aquatic plants so you can
compare and contrast the difference. A dry mount requires no water usually
used for inanimate objects. Depending on what you are mounting will depend on
how long they last. There are many ways to make dry mounts. Cutting
specimens with a razor makes the edges clean and straight so it is easy to
focus and attach. However, using a razor can be dangerous so using something
like cork can make cutting a specimen easier. Once the object is cut you can
use white glue or other mediums to glue the object to a stiff cardboard or
glass slide. In lab we will make a dry mount of two aquatic plants so you can
compare and contrast the difference.
 A wet mount
requires water and is used to prepare temporary slides to observe living
organisms. Larger organisms are usually immobilized by the coverslip
but the very small may be able to move for a while. The organisms will be
alive for a short period of time, but they are usually stressed so information
derived may not reflect their normal life cycle. You usually put a drop of
water that you suspect has little critters on a glass slide. Larger organisms
may not fit under a coverslip and you may “squish” the critter. You may
need a few drops of water depending on how large you coverslip is. Put a
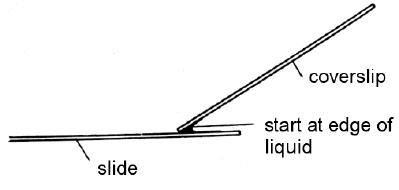
coverslip over the drops by gently placing it at an angle to remove any air
bubbles. The coverslip makes the height of the slide is uniform, so it helps
in viewing under a transmitted light microscope. A wet mount
requires water and is used to prepare temporary slides to observe living
organisms. Larger organisms are usually immobilized by the coverslip
but the very small may be able to move for a while. The organisms will be
alive for a short period of time, but they are usually stressed so information
derived may not reflect their normal life cycle. You usually put a drop of
water that you suspect has little critters on a glass slide. Larger organisms
may not fit under a coverslip and you may “squish” the critter. You may
need a few drops of water depending on how large you coverslip is. Put a
coverslip over the drops by gently placing it at an angle to remove any air
bubbles. The coverslip makes the height of the slide is uniform, so it helps
in viewing under a transmitted light microscope.
|

Putting a converslip on a glass slide
|
|
 A dry mount requires no water usually
used for inanimate objects. Depending on what you are mounting will depend on
how long they last. There are many ways to make dry mounts. Cutting
specimens with a razor makes the edges clean and straight so it is easy to
focus and attach. However, using a razor can be dangerous so using something
like cork can make cutting a specimen easier. Once the object is cut you can
use white glue or other mediums to glue the object to a stiff cardboard or
glass slide. In lab we will make a dry mount of two aquatic plants so you can
compare and contrast the difference.